All of my cutting file shares are free. Please do not redistribute or sell what I freely share. These cutting file shares are for personal use only.

Please be fair and give credit where credit is due, in turn, I will always make an effort to give credit to my resources and link them appropriately. Thank you for your consideration.

Monday, April 18, 2011

I Never Promised You a Rose Garden...Well, Maybe...I Did :-)

After seeing a marvelous punch shape on the internet I created a Silhouette cutting file for this marvelous rose. It looks soooo..... realistic. The picture does not do it justice. This cutting file will be shared on the Silhouette Plus Group file shares for the "In With A Buzz" members. Sign up and start posting to get this awesome cutting file. You can decorate frames, packages, make topiaries and so much more with this lovely cutting file. There are some great tutorials on how to shape the petals and give it dimension on YouTube.

I use ink on the edges and center to add depth. Chalk and markers can also be used but, I find inking best for my technique.

Come on an join our fun group with all its wonderful sharing, caring, and helpful members. Her is the link again to join in the fun:

http://z15.invisionfree.com/Silhouette_Plus/index.php?act=idx

Sunday, April 17, 2011

It's a Lily Freebie!

What would Easter or Spring be without a pretty Lily to decorate a Easter gift. I will use these instead of bows for a pretty Spring looking package. Here is how I made them:

1. Cut all of the petals out on a plain white piece of cardstock.
2. Cut the leaves, centers of the Lillies, and the base of the Lillies on a pretty green cardstock.
3. Using your fingers rub the petals enough to work the paper a bit to smoth out. You can use a small tool to curl the edges of the petals just a bit. You want them to look as realistic as you can.
4. Ink the edges with a pretty color of your choice. I used mauve. Using a sponge apply some of the color in you have chosen in the center area of the petals. After you have done this; use a burgandy colored marker and dot the centers as seen in the ones below.
5. Glue each petal ( 6 petals) to the starburt shape with a quick dry glue. I used Allene's Tacky Glue.
6. The center of the flower is the piece with the little circles on the ends. Color these ends with the burgandy marker; as well as the center circle. Apply a dab of glue and place it into the center of the dried Lily.
7. Rub the leaves to work the paper a bit. Next, use a tool on hand to scratch the fine lines of the leaves to make them look more relistic. Now, you can grab a darker shade of green ink and rub it on the leaves to create some depth in the leaves. Make the edges and the base of the leaves a bit darker.
8. Glue the leaves to the back side of your Lily.
9. Work on the look and shape you want for each petal and leaf. The fluff up the center of the Lily for a great looking flower.
10. Last but not least; sit back and admire your work.

Here is how my Lillies turned out:
Here is the link to the cutting file: http://www.fileswap.com/dl/7g3pojg/Lily_Template_3_sizes.studio.html


Monday, April 11, 2011

CANCER IS ONE UGLY!!! WORD

I've not been able to post much as I am now in Texas to help out my Mom and Step-Dad. His birthday was on March 13, 2011 and on March 14, 2011 he was given the horrible news that he has samll cell lung cancer which has invaded most parts of his body except for (thankfully) his bones and brain. I am so darn angry. He is a good man and the love of my Mom's life. I pray all of this chemo will put him into remission so he can enjoy life a little bit. The chemo makes everything taste metallic to him; he cannot enjoy food or drinks for several days after the three days of treatment. He goes to chemo for three days then he is off for three weeks. By the time he gets his taste buds back it it time to go again. During the week of his chemo he has three horrible days. He takes a shot for him immune system on Thursday. After Monday, Tuesday, and Wednesdays of chemo the shot  on Thursday kicks his butt. He doesn't start feeling better until Sunday.

On top of all that he is gong through; this past chemo led him back inot the hospital with a terrible type of pneumonia that wore him down. He has lost an additional 12 pounds of weight since his release. This week he will put several pounds of fluid back on since the chemo makes him swell up. This is one hell of a nasty trip he must take to get a little more life out of this life here on earth. I pray he gets to have some wonderful and much better days ahead.

Right now they are in the; what I believe to be the denial stage. The communications are closed and nerves are raw. Nobody, talks about the cancer, his hair is now falling out. As he rubbed his head yesterday and watched it fall to the ground he simply said; "Well, there goes my hair." his facial expressions said more. My Mom cries at the drop of a hat and her stress levels are over the top. I am so worried for her and the toll this all is taking on her,

They live out in the country and have so much to be done. I am taking care of everything I can but worry when I leave to go home; who will take care of them. My step-sister has been wonderful. She drives in every other weekend. She lives 72 miles away. She and her daughters have been wonderful about mowing the property. My brother lives near but, is at the hospital working all of the time. When he has a few days off he has to play catch up for his own home. He tries to come out and see them several times while he is off but his time has been limited. He also takes care of my biological Dad who lives here.

This seems strange to write about all of this on a crafting, Silhouette cutters blog but it is also to let my few readers know where I am and what is going on. I'm not sure you all will see too many new things concering crafting as my job here is to do all I can to help my family out. Please say a prayer for them. Thank you.

Monday, March 21, 2011

A Whole Lot of Crafting, Card Making and Sharing Going On

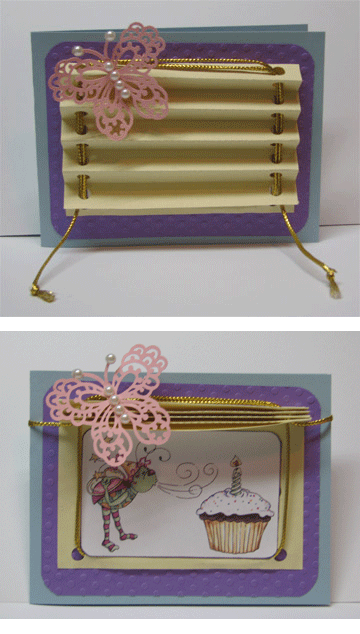
It has been a busy week of card making, crafting, and trying some new things. Thanks to Linda from Linda Lucine's Blogspot. I've had the opportunity to make a really cool Venetian blind card. She has just started her new blog and yet she has shared templates and wonderful tutorials for a Waterfall card, Venetian blind card, Spinner card, and the cutest gum wrapper. You have to go take a peek at http://www.lindalucine.blogspot.com/.

Some of the projects I've done this week include Linda's really cool Venetain blind card. Fio, from CraftandSmile blog gave us all on the Silhouette Plus group a really cool Swing Card template. She also shares a lot of ideas and inspirations on her blog. Here is a link to her Swing card:
http://blog.craftandsmile.com/

The Bunny In a Basket has some added things too. I decided to make a cutting file to make a cup treat holder. The back of the bunny is made by cutting out an extra oval from the cutting file. I just temporarioly removed the basket and duplicated the oval. The feet were just quick and easy cut outs I made. The bunnies pads were made with the left over ovals from the treat holder cup.

Oh, I also made another quilled wedding card and have another quilling project in mind. Quilling really is relaxing.

As many of you know I love making tear bears/ paper piecings. The Bear In A Box template was inspired by a request from one our wonderful group memebers. She found a card with a Bear In A Box on it and wanted to make one herself. I hade made one of these in the past using a tear bear. As soon as I saw her post I went to work to create a .jpeg template for those who want to hand cut and a cutting file for Silhouette users. check out the Silhouette Pus group and join in the file shares, tip, tutorials, and fun.

So, this is what I've done this week. How about you?

Here are some look-sees of what has been going on in my good ol' craft room this week. You will need to click on the pictures of the Swing card, Bear In A Box Card, and the Waterfall Card to see them move.


Click On The Pic. Below

Click On The Pic. Below

Click On The Pic. Below

Wednesday, March 16, 2011

An Easter Bunny In A Basket Treat Holder

Another day getting us closer to Easter and all of the Easter plans we will be making. I thought this would be a nice favor to add to your holiday table or basket . When I design and make these I'm never sure who will like them, but it doesn't stop me. If even one person would like it and can use it; this makes me feel good. My life is blessed and so many people have shared their ideas, inspirations, and love for crafting. It is fun to give back.

Over the years I have learned so much. This cutting file is just a tiny "Pay It Forward". The bunny and the basket are my original designs. You may share this with anyone you wish to share it with. My mother taught me; good things, or things we enjoy are meant to share.

The embellishments were punched out and the shadows of the basket and facial features were done with Copics, micron and gel pens. If you have any questions; please don't hesitate to send me an email.

 Remember, you have to cut out two of the baskets on your Silhouette to make it a pouch to hold items. If you want the template for hand cutting; please send me a message.

Have a wonderful  up coming Easter and Happy Crafting. Below you will find a picture of the Bunny In A Basket Treat Holder and a link to the download. Hugs, Debbie

Here is the link to download the template:
http://www.fileswap.com/dl/8vium4wR/Bunny_In_a_Basket_Holder_Cut_File.studio.html

Using a Card Cutting file Along with Some Quilling

It had been a long time since I quilled. After sitting back and feeling so relaxed as I turned the quilling tool; I wondered why it had been so long since I had done any quilling. After today I will remember how enjoyable it was and do more of it..I think..lol.

The finished card isn't designated to be anything yet. I placed a pouch on the backof it to hold a gift card or money. Most likely I'll save this one for a wedding. My plans are to make a pretty box to match it.

The nice thing about being a crafter is the learning, sharing, and being able to jump all over the place with various arts, mediums, and crafts. Who knows what I'll be making tomorrow.

Sunday, March 13, 2011

Having Fun Making Silhouette Studio Cutting Files

Another Silhouette day and I've been buys making box and card cutting files. I share them for free on the Silhouette Plus forum but today I thought I would go ahead and give the link to the Bag Box cutting file. This is a cute little gift bag. I used some left over scrap paper to embellish it. The little flap that holds it closed isn't in the cutting file neither are the flowers at the bottom. I used a punch to make this. Sometimes when I 'm making sample projects I just throw them together with things laying around on my craft table.

I hope you can use this file. I know over time we collect sooo many files and we're never sure of what we have or don't have. I make a seperate folder for each of my designs and take a screen shot of them or a picture of the finished project.After I do this I create a new folder and name it the name of the cutting file. Once this is done I drop the cutting file and the picture of the cutting file into the folder. When I go to view my Silhouette Studio cutting files I always choose thumbnail view; this way I can see exactly what cutting file I'm using. When cutting files are added to the SS library you  can also see what the cutting file looks like. The reason I don't upload all of my cutting files to the SS library is; I don't want the program itself bogged down to the point of taking forever to open.

If you grab this file don't forget to snag the picture too. It is always nice to see what we are cutting without having to open it first. I hope this helps you enjoy your cutting file system a little bit more.


Here is the link to the cutting file:

http://www.fileswap.com/dl/7eAcLd0M/Bag_Box_Cutting_Template.studio.html