All of my cutting file shares are free. Please do not redistribute or sell what I freely share. These cutting file shares are for personal use only.

Please be fair and give credit where credit is due, in turn, I will always make an effort to give credit to my resources and link them appropriately. Thank you for your consideration.

Monday, March 18, 2013

A Mirrored Pop Up Surprise

I spent two days designing this file to get it just right and I must say, after I got it the way I wanted it, I couldn't be more pleased. I'm also pleased to be able to share it with all of you.

Unfortunately, my band width is limited and I'm afraid to run out so I will have to email this cutting file. If you click on the "Email Me" link on the right hand side of my blog, I'll get it emailed to you as soon as I can.

The donations I've received have been very kind and generous from those whom support my efforts to create cutting files and videos but there haven't been enough donations to pay for extra band width on a yearly basis. I may have to begin making all of my cutting file shares available to those whom make a donation. My cutting files have been downloaded so much it goes through 5 GB of band width but donations are only made by a few. I know times are tough. I too have felt the crunch of this economy. As much as I love to share, I need to be sensible and not take money from our household income to share cutting files. If I received even a small donation from those downloading it would probably make it financially easier to increase my band width and spend the time to make cutting files and videos.

Recently, I received a donation of $1.00 from a lady whom apologized for only sending $1.00 because she was on a fixed income.She also wrote the sweetest thank you note. I was so moved by her kind donation; it was as if she sent me a million dollars.

I'll continue to make and share videos. YouTube is free. :) but, I'll probably have to limit my file shares. It is a time consuming to email out the cutting files but at this time, it is the best way I know how to save on band width.

Now to the details. On the video you will see two pop-up cards. The first one I made using the PDF file freely shared on the Popupology website. If you want to learn how to convert these files to .svg files you will love the tutorial Kay, from Clever Someday has shared. She is brilliant so please look around while you are there. The discoveries you'll make will be worth the time. I would like to thank Kay for all she shares and her brilliance enlightens us all.

The second pop-up card I designed (this is the one I can share if you email me) can be used as just a design card or it can be embellished like the one in the video. You have t take your time while folding this one. I must have folded twenty of them while I was trying to get this pop-up perfect. The cutting file is in .svg, .dxf, and Studio format. The graphics I used are copyrighted so I can't share them. I purchased them from the now closed :( PCCrafter Hug Club. The Bunny and Happy Easter sign are from the graphic set "Bunches of Bunnies" by Pat and Michele Olsen. The eggs are from various PCCrafter artists.

For any of you whom viewed the first video, I apologize. I allowed YouTube to make some auto correction which ended u making the video look all wobbly. I thought I was going to be sea sick...LOL.


Thursday, March 14, 2013

The Things You Can Find and Make

I just finished cutting a card I made by using a fun template from Popupology. The PDF is free and made for a nice challenge. I changed some lines around and converted the once PDF file to  a nice Studio cutting file. I've always wanted to go to London so when I saw this St. Peter's Cathedral card I knew I had to give it a whirl.There are some great finds out there in the WWW (world wide web). I felt like I hit the jackpot.

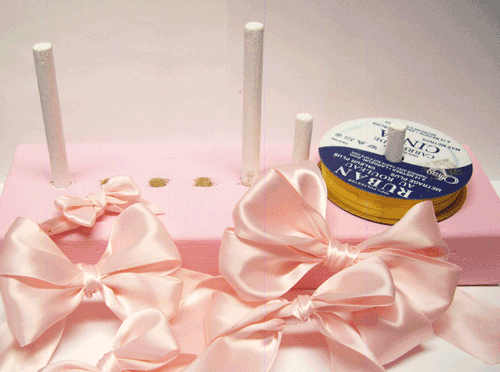
Next, I started on some more Easter projects. Every year we host an Easter egg hunt, dinner, and of course make baskets for all of the children attending. I'm blessed to have such a wonderful husband who took the time to make Easter crafting easier.  I've been wanting a bow maker for a long time. I have a Bowdabra but it's not been my favorite. When I saw a post on the Silhouette Plus forum about the bow makers it made me remember what a pain it was to make all of the bows I made last year. I had been meaning to get one of these made but wasn't exactly sure what I needed. My wonderful husband took this on as a "no problem" project and made me one in under an hour. All we needed were things we already had laying around the house like a piece of left over wood which he cut down to about 10" and it is 1 1/2 " thick. I had a 3/8" dowel rod so he grabbed his cordless drill, a 3/8 inch paddle drill bit, made some markings on the wood to place each hole 1" apart. He drilled 9 holes and I can make a 1" to 8" bow. The bows turn out great! I couldn't leave it looking all plain so I grabbed a brush and painted it pink and the dowel rods white. I did learn something which should never be done. Do not place the dowel rods in the holes to let them dry. The moisture of the paint made the wood dowels swell a bit and they were stuck like glue. After it was nice and dry I was able to pull them out but this was no fun and I had to sand the dowel rods to get them to fit perfect again.

The day wasn't done. Knowing I needed lots of decorations I made a cutting file of an Easter chick and and egg.Using my trusty Cameo, I set up this cutting file as a Print and Cut. One I cut as a paper piecing and a smaller one as a plain Print and Cut. I'm hoping be getting more of them made tonight.

Peep books are one of the things I try to make for the little ones each and every year. I haven't got around to making these just yet. I can hardly believe Easter is so close and I'm always behind as usual.

This was a yesterday project. I was using my Cameo and thought....hmmmm... I wonder how many Silhouette Studio users don't know about some of the features which may come in handy so I made a video. I want everyone to learn all they can about the software so I make new videos when things come to mind but I always seem to leave something out that I wanted to share.

So, this is the day in the life of Debbie...lol. Thank you for stopping by and taking a look around. Hugs to all.


St. Paul's Cathedral Pop-Up Card


New Bow Maker


Paper Piecing Print and Cut Chicks


Paper Piecing Chick


Monday, March 11, 2013

Easter delights and more going on


A Basket Filled with Easter Goodies

As many of you know, I enjoy making videos and sharing free cutting files but the donations I get aid in my efforts to be able to spend the time doing this. Last month, I made a set of cutting files for those whom so kindly and generously donated. Each month, I'm going to try and make a set of cutting files for those whom make donations. I know times are tough for many. Since I lost my job, we have had to make a lot of cut backs too. Donations make it possible for me to buy some of the supplies I need. I don't get too many donations but the ones I get are very much appreciated. 

This set is in Studio, .svg, and .dxf file formats. Each file includes a picture so you can easily keep them organized.

This month, I've made a set of cutting files for Easter. Those whom make a donation of $3.00 or more will receive all of the files posted below. I hope you enjoy making them.

The "He Is Lord" cutting file is one of my all time favorites. As a Christian woman I felt inspired to make something for our Easter gathering to remind everyone what Easter is all about. The three crosses are symbolic of our Lord and Savior's sacrifice.I added the dark panel at the last minute. I wanted the cross representing Jesus's sacrifice to really stand out. If you place this 3D table decor at eye level it looks amazing! My husband asked me to edit this post to make sure to let everyone know how good it looks sitting on our fireplace mantle. :)

The Bunny Place card holder will look cute on any Easter dining table.

The 3D hinged egg is adorable! Once you put it together, all you have to do is use some strips of paper or ribbon to cover the seams, embellish it and fill it with goodies. The weight of the treats helps to balance the "hinged egg" so you can enjoy seeing this darling egg sitting on a table.

Next, is the Paper Piecing Bunny. It can be done as a Print and Cut or paper piecing. I really enjoy making paper piecings. When I did the test cut for this file; I added a box to the back of it, glued the tail on the box and now it's a treat box holder. There is so much you can do with one cutting file.

Speaking of so much you can do with one cutting file. I also made an Easter Pop-Up card with the very same bunny. 

Last, but oh so fun to make and it comes in real handy. The one in the picture is the one I made as a test cut file. Later, I made one with cereal box weight chipboard, sprayed it with Design Master 14 KT Metallic Finish Gold craft and home decorating paint. Now I have a nice sturdy lipstick organizer.A friend of mine was over on Saturday and offered to buy the sample one I made. Of course, I gave it to her. She loved it. The nice thing about this cutting file is, when you remove it from the box the inside can be made to lay flat.

There's a whole lot of Easter goodies in more in this set of cutting files. If you make a donation any time this month I'll email this set of cutting files to you as my way of thanking all of those whom donate. If you send a donation after the end of this month but you would like this cutting file, just add a comment with your donation with the words, "Easter Basket Goodies". I always try to get these out as soon as I can. Thank you all for you love, kindness, and support.  

Hugs, 
Debbie


3D Hinged Easter Egg


He Is Lord Table Top Decoration


Bunny Place Card Holder


Easter Pop-Up Card


Easter Bunny Paper Piecing and/or Print and Cut


Lipstick Organizer

The Polaroid Card and One More Little Freebie

Oh boy, have I been busy this past couple of weeks. I've been designing cutting files,test cutting files, converting them, answering emails, and making a new video for the "Die Cut Crazy!" magazine. It may be busy work but I sure do love it!

Today, I'll have my sweet granddaughter. I get to enjoy her two days of the week. I don't get on the computer until after she has gone home with her mommy. This is about 8 p.m. at night so I try hard to multi-task on the two mornings I have her to get all sorts of things done. She gets her around 1:00 so I get as much done as a grandma can in the morning hours.

First, I'm going to start out by sharing the cutting file for those whom didn't want to try the design challenge. I hope many of you did but, designing is not fun for everyone. Tor those whom didn't want to try it and have been waiting for this cutting file, I'm posting the download today.

A dear friend from the Silhouette Plus forum (Barbara/ bdjeepers) sent me another Polaroid camera. It's a great image. I can't wait to make a card with this one and I'll be sure to share when I get it done.

You can grab the Polaroid Pop-Up cutting file -----> HERE

I have another little freebie I thought you all might enjoy. This will come in handy for those gift giving cards and cash. It's a Wallet Gift Card Holder. I cut two small magnets to make the closure. You can use a magnet or those small circles of velcro. If you use velcro, make sure you use a nice heavy duty card stock. You can download this cutting file ----> HERE


Wednesday, March 6, 2013

Polaroid Pop-Up Challenge

Good day everyone. I'm rushing to get this posted. My darling granddaughter will be arriving soon and as many of you whom have little ones or babysit know, there's no time for computers. These little ones are fast! but oh so much fun.

My goal in making so many YouTube tutorials is to teach others to use their Silhouette Studio software to think it and make it; design, play and have loads of fun with their Silhouette cutting machines and the wonderful Studio software. As many of you already know, I use the Silhouette Studio Designer Edition and love it!

Here is the challenge I'm passing along. I received this challenge from a good friend. She sent me a PDF file and asked me to make a pop-up card from one of the three pictures. I chose the Polaroid camera. If you've never used a free program called Bullzip to convert a PDF to a .png file you'll want to check out the video Bullzip to Open PDF made by Krafting Kelly from Finding Time to Create to learn how to do this.It's great!

Are you ready to create your very own pop-up card ? You can grab these images so generously shared by Brit and Co. ------> Here

I would love to see and post the cards you make with these images. If you email the pictures to me, I would love to share them here. ( My email link is on the right hand side)

Here's what I did. In a week, I'll share the cutting file I made to make this card. Please remember, my photography skills stink and this card is so much cuter than it shows in the pic.

Hugs,
Debbie


Tuesday, March 5, 2013

Bouquet of Shamrocks

Who wouldn't love to open a card on St. Patrick's day to find a card blooming with shamrocks. I've been meaning to share this file way before now but things around the old homestead have kept me hopping busy. I wanted to make a video to show how it works but didn't have the right kind of tripod and hubby retired as the "human tripod"....lol. I finally bought that desktop tripod so hubby is off the hook. It just arrived.

I would like to send out a great big hug and thanks to Diane ( Mz.Daisy) from the Silhouette Plus forum was kind enough to try it out and test cut it. Thank you dear friend.

You really have to see this all put together and opened. My daughter loved it.

I hope you all enjoy this cutting file. It's in .svg, .dxf, and Studio format. It also includes instructions. You can download this file ----> HERE


Wednesday, February 27, 2013

Magic Camera Shutter Card

I saw this card on YouTube and fell in love. Sadly, the fellow was just showing the card but he inspired me to make this cutting file. As soon as his video was over, I went to work.

My brain wasn't working well yesterday so I spent a good part of the day trying to get things perfect for this cutting file. By the time my hubby arrived home from work I was a bit frustrated. I presented him with a hand full of cards I wasn't happy with. As soon as he looked at one of the cards, he had it all figured out. I ran, yes ran back to my craft room to make some changes to the cutting file. Print and cut all of the pieces...again! then put it all together. A happy dance was going on. I love the way it all worked out.

I've worked on making various sizes but haven't perfected the largest one yet. I hope to get back to it tomorrow so I can share the larger one with you. It works as it is but it is difficult to open and close. I know, nobody want to have to send instructions to the people they send card..lol.

If you would like to download this cutting file which comes in .svg, .dxf, Studio formats, includes PDF instructions, you can download it -----> HERE

Have lots of fun playing with this card. I love card that do something. I hope I get to see some of your card creations with this Camera Shutter card.

Here's a peek of how it works. My dear hubby also assisted by doing the video taping. He has now asked me to please buy a new tripod....lol


Sunday, February 24, 2013

One Cutting File Equals Many

Good day everyone! I would like to start out by thanking everyone who has made a donation. Thank you for your kindness and support.

Today, I would like to share a couple of ways I used the "Luck of the Irish" cutting file sets by using a couple of pieces in the set. I've created two pop-up cards by adding just a couple of things. The other pieces were used to embellish the front of the cards. I love anything on a card that moves, pops up, has dimension, movement, or a little surprise. I guess it's the kid in me. :)

The great thing about all of the cutting files we collect over time is the many ways one thing can be used in so many way. Below are just a couple of way I used these.

This is the picture of one quick card I made using the "Luck of the Irish" tag, words, and the little Leprechaun I had hand drawn using Silhouette Studio. All of these pieces are in the cutting file set. I just love the way the little Leprechaun pops up when the card is opened. What a fun surprise. I'll have to get this one in the mail for my mom. She loves stuff like this.


The pictures below are the cover and the inside of the second card I made with the "Luck of the Irish" cutting files. The Leprechaun hat was used on the cover, a little bling of glitter was applied to the shamrock, and the three little shamrocks on the front are those left over pieces from the tag. I used the "Luck" shamrock to make the pop-up element for this card. 


P.S. Yes, another P.S.....lol. I wanted to let everyone know, both the Leprechaun hat and little Leprechaun were all hand drawn in Studio. There is so much we can do and create with this awesome software. Again, I would like to add, if you don't own the Silhouette Studio Designer Edition, I would highly recommend purchasing it. P.S.S. - Many may think I am, but I am in no way affiliated with Silhouette. I just love their cutting machines and software. Hugs, Debbie