All of my cutting file shares are free. Please do not redistribute or sell what I freely share. These cutting file shares are for personal use only.

Please be fair and give credit where credit is due, in turn, I will always make an effort to give credit to my resources and link them appropriately. Thank you for your consideration.

Thursday, July 26, 2012

Stationary Card Box

Some time ago I made a Stationary Card Box by using a tutorial on Splitcoasterstampers. The tutorial is by Jackie Topa. The tutorial is great but it took me a while to make it. I gave the first one I made to a friend as part of her birthday gifts. She loved it.

Now that I have a Silhouette Cameo that can cut the 12 x 12 card stock, I wanted to have a cutting file to be able to cut and assemble this adorable stationary box a lot faster and easier by not having to do all of the scoring and cutting. It took me a while to make the cutting file but it was worth the time. Now I have it on hand to make a nice gift a lot faster and easier.

Even with this cutting file on hand it would be a tremendous amount of help to look at the tutorial by Jackie Topa on Splitcoasterstampers. Here is the link for viewing her wonderful tutorial: Stationary Box Tutorial. I'm so glad I was able to locate it again. I thought I had the instructions saved on my computer but I didn't. Without Jackie's great tutorial and measurements, I don't think I would have been able to make the cutting file.

Since 12 x 12 card stock has to be used to make the Stationary Card Box, I had to make this cutting file for the Cameo. Usually, I try to share cutting files for all Silhouettes. It would not hold cards if it were made into a smaller format.

I have placed all elements of this box on one cutting file. All you need to do is cut one part, slide it off the cutting area then, move the next part on the cutting area. I have grouped each part of the box. For the note card paper. I copied this one onto a new work are so I could do a print and cut of the lined paper to add to the note pad. I made eight sheets of paper using regular type paper.

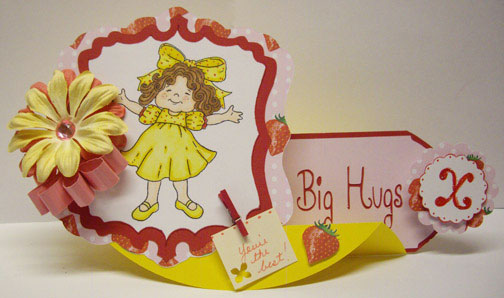
Each of the ladybugs on the note cards and tags were hand colored to give these tiny images some vavoom. The flower on the front was made by crumpling 1.5 inch scallop shapes, peeling them into two layer each, and building the layers to create the flower.

Here is the link to download the cutting file: Stationary Card Box Studio Cutting File

If you ever have any questions. Please feel free to contact me. I hope you try this one out and have lots of fun making it. It will make a nice gift for anyone. xxx - Debbie


Tuesday, July 24, 2012

Head Bands and Hair Bow Silhouette Style

It's still a week for making party favors and birthday gifts. Since our little granddaughter is only going to be one year old her hair is still baby silky and she has a hard time keeping hair bows in her hair. I bought her a couple of outfits and wanted her to have some matching head bands. The hair bow is for our 4 year old granddaughter whom loves everything girl.

To make these I ironed Heat and Bond interfacing to the backs of the cotton material. When ironing this Heat and Bond onto fabric (like cotton fabric. This is what I used) make sure the bumpy feeling side is down. The bumpy side is what holds the glue. After I made sure the Heat and Bond was set, I placed it on my cutting mat and let the Silhouette cut away. Because fabric scissor and paper scissors are used for two different purposes using one to cut the other can dull scissors real quick I took on the same philosophy for the Silhouette ratchet blade. I've dedicated a ratchet blade just for cutting material. The setting I used for this project is the "Cotton Canvas" settings which are Speed - 5. Thickness - 33, and Blade - 5. I tried the "Fabric Cotton Print" setting and it just didn't cut as well.

After I cut out all of the flower shapes ( it is a Silhouette shape. I believe it was one of the free shapes) I sprayed it with Fabric Stiffener which stiffens the fabric a little and seems to help with fraying. I looked all over the house for my No Fray can of spray. I'll find it when I don't need it...lol.

After the flowers dried I began putting everything together. I'm not a sewer so this makes me a huge fan of that wonderful fabric glue. It works great! Next, I hand cut circles of tulle, folded them in half twice and fabric glued them under one of the layers of the fabric flower to lift the petals. After I let them set to dry, I glued them onto the head band.

This is a project you will enjoy doing for those little girls in your lives. I think they would also sale real well if you do craft shows. If you have any questions, I always welcome any emails where I can be of help.

Happy Crafting Everyone!

Note ** : For safety, the center buttons are sewn on.  


Saturday, July 21, 2012

Silhouette Studio Tutorial - Low Pass Filter

My house is quiet so I'm on a roll making video tutorials. I decided to make this one because, very often I've been asked about the Low Pass filter in the Studio software. This is part of the Auto Trace feature in the Silhouette Studio software. This video shows how the Low Pass filter can be very useful for many images we want to Auto Trace.


Scrapcoloring.com working with Studio Tutorial

Earlier I had posted about a wonderful site Clever Someday ( Kay) from the Silhouette Plus forum and her blog Clever Someday shared. After I had read her post the excitement of being able to make and use 4 patterns on one page thrilled me. I made a template and shared it her in the first post about Scrapcoloring.com so every one could enjoy the benefits of using this fun and handy  on line tool. I had also promised to make a video tutorial on how to use this site to create patterns and use them with the Studio software. Here is the video. I hope you give it a try. I've really enjoyed using it for so many recent projects. Have fun!


Friday, July 20, 2012

Personalized Mini Album and Tutorial

Next week is my granddaughter's birthday. I sure have been busy making all kinds of birthday goodies. The cupcake toppers are done, the banner is done, the favor box is designed and I still have lots to do.

The one thing I couldn't resist making for our little Avelyn is a personalized mini album to be a part of her baby book. I'll add more pictures after the party. This mini album has to have he first birthday pictures in it. :)

Making this mini album was very easy and went together pretty fast. I only had to us 2 pieces of card stock to cut all of the album pages and 2 colored pieces of card stock for the letters in her name.

Getting the photos re-sized and designing little frames for each one took the most time. The results were wonderful! I did a little embellishing but will add some more later on.

These pictures below and in the tutorial only show one of the pages to give everyone an idea of an almost finished page. This is a small mini album. It measures 2 inches wide by 9 inches in length after it is all together but it still held a lot of little pictures. I'm sure you can see, the theme for her party is ladybugs. :)

The tutorial will show you step by step, how to make your own personalize mini album. Of course, when I make a video this is when I mess up. If anything in the video needs more of an explanation please feel free to email me.


Thursday, July 19, 2012

Double Lid Box Freebie

I'm a busy blogger today. I was working on a box to try out for an up coming birthday party. The them is lady bugs. I just threw this one together to show you what the box looks like after it is cut and assembled. I made it to fit on a letter size piece of card stock so all of you with various Silhouette cutting machines can use it.

For my granddaughter's favor boxes the lid knob will be a lady bug. I'm anxious to see how it will turn out so, back to the crafty room. This is my favorite room in the house.

This box I call the Double Lid box can be downloaded here: Double Lid Box Studio Cutting File Download

If you get the chance to make and decorate one of your own I sure hope you will share it with me. I love to see what others do with cutting files I've shared.

Happy crafting and creating everyone. Thanks for popping in for a visit.


Exciting News! ScrapColoring

Kay, is a member on the Silhouette Plus forum but she also has her own blog and you have to check her blog out. I'm not kidding. She finds and shares some of the most ingenious things on the internet. Here is the link to her blog Clever Someday Blog.

She shares a terrific link to a site in which you can generate your own high resolution digi paper. The neatest thing is; she came up with a way to make a digi paper in 4 different matching patterns.. This will work great in Silhouette Studio. Below is a picture of how I would use Kay's(Clever Someday) brilliant idea to cut out images. I can think of so many wonderful possibilities on using this wonderful idea.

To help get you started I made a template for you to use to make your own 4 square patterned papers. Here is the link to download it: Scrapcoloring Template Download. All you have to do now is to hop over to Clever Someday's blog to learn more about this great on-line tool. Please don't forget t leave her some blog love. She is a wonderfully sharing and giving person.


I'm editing this post to add an Award Ribbon I made using the paper shown above. The Award Ribbon is one of Lori Whitlock's Silhouette Studio cutting files. I tried to include each pattern as part of the Award Ribbon. Some of them can't be seen too well but it was so nice to cut all of the shapes in this cutting file with the various patterns. 

Coming soon! I'll be making a video tutorial on how to use the template and how to use it in Silhouette Studio so you won't use too much ink. 


Tuesday, July 17, 2012

Vintage Card with Tangle's Treasures Art

This vintage card was created using another vintage image from Tangle's Treasures. When I saw these antique looking spoon handles on the Tangle's Treasures website I couldn't resist them. The first thing I though of; was to use them as a tag for a card.

The vintage look I tried to achieve was bringing in different elements like the Cameo, Prima note card, some dark blue rhinestones (gotta have that bling!) and black satin ribbon. The entire card was inked including the Tangle's Treasures vintage spoon used to make a unique tag with the Thank You sentiment added. The flower was made by using a scalloped punch, roughing up the paper and peeling the layers apart, then I crumpled them up some more. After I got all of the layers nice and crumpled, they were also inked.

For those of you who enjoy vintage images I highly recommend visiting Tangles (Rebekah) blog and Etsy store. Here is the link to Tangle's Treasures Blog. You will find lots of fun things to do and make and the link to her Etsy store to buy up some wonderful graphics. Remember, she posts her sales events on the Silhouette Plus forum so stop by there too.

Thanks for visiting and leaving me some blog love. I would like to share a little freebie with all of you who take the time to drop in for a visit. This link will let you download the Cameo you see in the picture of the card. Cameo Download

I've used this Cameo for other projects. One of the things I like to do to make it look even more like a real Cameo is to add some Glossy Accents by Ranger Inks to it.

Monday, July 16, 2012

Tangle's Treasure Delights

When I received these graphics from Tangle's Treasures I could hardly wait to create something with them. The first thing I made was a card with the adorable "Owl' graphic set. I think they are adorable. You really have to go and check out Rebekah's wonderful designs, graphic sets and elements. You will have a creative frenzy with her lovely items.

The owl set was complimented with the beautiful "Whimsey" design paper. Everything here was done using the Print and Cut feature with the amazing Silhouette Studio software.Layers of the owl, flowers, and moon are used to add a bit of dimension.

When I saw the set of Princesses I thought; what a terrific set it would be to make some paper doll sets. I didn't have the magnetic sheets to make the magnetic paper dolls but I did cut this out like a paper doll set and then had soooo....much fun dressing her up and embellishing her clothes.

I have some more wonderful things from Tangle's Treasures to play with. I'll make sure to share them here when I get the time to play around some more. Now I have to get to the kitchen to prepare a special dinner for a special friend. xxx - Debbie


Thursday, July 12, 2012

Cupcake Gift Card Holder

Today, is my dear friends birthday. I won't say how old  ..hmmmm...uh, I meant young she is but she is a great person and a wonderful friend. I wanted to make her a fun card to open up with a surprise in it. She has never had a pedicure so, this card will contain one gift card for a relaxing pedicure with a massage.

To make this card Print and Cut all of the pieces with your Silhouette cutting machine.After it's all cut glue the base of the cupcake only on the side and bottom edge, lining up the holes. The top of the cupcake will glued the same. Add a brad to fit inside the hole. Using a Sharpie brown marker, I painted the brad to match the dark on the cupcake. After you add the brad, glue the third cupcake top to the back to cover the back side of the brad. The fun part is filling it with cash, gift card, or a note

I hope you have lots of fun making and giving this card to someone special in your life. Happy Crafting everyone.

Happy Birthday Joyce!

Cupcake Cutting File Download


Friday, July 6, 2012

Rounded Step Card Cutting File Share

Norma, From My Craft Room created this amazing tutorial and template on how to make a rounded step card. She used various shapes to show how you can modify this template. I was so excited to follow her tutorial step by step to be able to re-create it into a Silhouette Studio cutting file. Click on the words From My Craft Room to visit Norma's wonderfully creative blog for inspirations and instructions. She has one lovely blog.

The cutting file I am sharing will have two cutting files. One file is for the rounded step card and the other is for the elements I used to create the card pictured.

The big X is mounted on a wobbler ( home- made of course ); I love interactive and moving parts on a card.This card also rocks back and forth to make it even more fun.

A couple of more things about this card: The bow is a quilled bow. It's super easy to make. All you need to do is cut 5 pieces of equal lengths of paper, run them through a paper crimper, round the strips into loops and glue them together at the base of each loop. The last thing you need to do is; add the 5 loops to a small rectangular piece of card stock. You can use different elements of your choice to make this card your own. The little girl was shared with me by a friend. It's colored it with Copic markers.The back ground paper is the strawberry pattern I shared in an earlier post. I just filled the shape with the pattern I loaded into my Studio program.

The internet is such a great place to find lots of inspiration and ideas. I am so glad I found Norma's wonderful blog. I hope you enjoy making this card and adding your own special flair to it.


Click Here to Download the Rounded Step Card


Thursday, July 5, 2012

Slider Card Video Instructions

I did it! I made the video to show everyone how to put the firecracker card together. This cutting file can be used for any type of card you would like to make. All you have to do to change the paper design is to go to your "Pattern" window, ungroup the card, select the bottom portion ( the stripes) which is set to "No Cut" in the " Cut Style" window and change the pattern. After this you can then select the top portion (the stars) and fill it with the pattern of your choice. You can also just cut it out with one of your favorite card stocks. Change the design to anything you want to slide out. Make this card your own for any occasion.

This is my first on camera video tutorial. I hope the instructions are clear enough and you enjoy making this fun interactive card. Thanks for stopping bye. I'll see some of you on the Silhouette Plus forum. Happy crafting to all. : )

Oops, oops and double oops! I totally forgot to share the download for this cutting file. I am so sorry. Here it is: Download for Firecracker Studio Cutting File


Wednesday, July 4, 2012

Fourth of July Card

This Fourth of July celebration was disappointing for many I'm not complaining when there are people dealing with the horrid fires in Colorado. We have had some kind of hot, humid, down right muggy, sticky, weather. Due to our lack of rain; fireworks were banned this year. They did end up having a display down by the river.

Our grandchildren came over for a visit today and I wanted to have a card for them to have some fun with. They loved their interactive fireworks card.They pull up on the top and the the flames come out on the top as the 4th of July wishes come out at the bottom.

Both cards were made by using the Print and Cut feature of the Silhouette Cameo. I had some wonderful patriotic digi paper I used to fill them with. First, I filled the entire top section with the star paper. Next, I needed to draw a rectangle shape to fill the bottom with the stripes. I made sure to select "No Cut" in the cut setting window since I only wanted the striped area to print on top of the starred portion.

Later on when I write the instructions, I will share this cutting file so you can have some 4th of July card fun ready for next year.


Here's another interactive card we had fun making. It's so hot here, I found this one refreshing. The graphics are; "Down By the River" by PCCrafter artists. Unfortunately, PCCrafter is no longer open for business. I miss them a lot. I'm a graphic hoarder....lol. I wish I could share this cutting file but the graphics are copyright protected. 


Silhouette Designer Edition On Sale ! Update!!

Jessica Sprague has sent out an email. woohoo! For those of you who don't already own it; now is the time to get one great deal. You can order the DE at this link: Order Silhouette Designer Edition The code is: JESSICA. It will be on sale from. July 4, 2012 to July 11, 2012. 

Monday, July 2, 2012

Prima Freebie!

You don't want to miss any Prima freebies. The shares are fabulous over on FaceBook. All you have to do is go to FaceBook and click the "Like" button so you want miss out. Here is the Facebook link : Prima Marketing Flowers

Three of the cards I made and shared here on my blog were made with the Prima note cards. This was another promotional freebie shared on FaceBook. I love Prima!

Prima designs are so easy to Auto Trace in the Studio software. After you do this, you will have a wonderful cutting file to use over and over and it's so easy on your hands when you can use a cutting machine.

This is what I found today! You can download it here : Prima Envelope and Journaling Tag


Wine Glass Lampshade

Making this cutting file was a doozy. I spent two days trying to perfect it. At last! I did it! Now that it's done I feel good about being able to share it. I'll never share a cutting file I haven't done a test cut on. So, all of you Silhouetters who are looking for something new to cut; here it is.

This is a Silhouette Studio cutting file. The newest file I made to share is perfected and fits on a many different sizes of wine glasses.

If you enjoy my blog please link it  for others to enjoy some free Silhouette cutting files, tutorials, and craft ideas. You can also subscribe to my blog so you won't miss any of the new file shares. Thank you for visiting.

You can download this file by clicking on this link: Wine Glass Lampshade

P.S. I'm sharing the cutting files here again because with the expense of the Silhouette Learning Center and the low traffic I figured it was best to just keep up my blog and do all of the sharing here. I'll be shutting down the Silhouette Learning Center web site today. sad_2